How to spud potatoes?
 As you know, hilling potatoes is necessary to increase yields and protect tubers from adverse weather conditions. That is why all gardeners who grow crops should know how and when to huddle potatoes, as well as be able to use hilling devices.
The need for hilling potatoes

Over time, potatoes grow and come closer to the surface of the earth, which indicates the need to harvest. In addition to increasing yields, hilling protects tubers from the hot sun or possible night frosts, as a result, they do not turn green and do not deteriorate.
Time of the first and subsequent hilling
 In order to achieve a good harvest and protect the crop from adverse weather conditions, you need to know when to sprinkle potatoes for the first time, as well as how many times to carry out the procedure in the future. It would be nice to do hilling on wet ground after rain or glaze... In this case, the stolons, on which tubers are subsequently formed, will begin to grow even faster. A paddle threshold on too dry soil can be very harmful to potato bushes.
 There is an opinion that hilling should be carried out two or three times:
- The first procedure should be carried out when the potatoes grow 5-10 centimeters. If night frosts are expected, it is recommended to completely cover the bushes with earth to protect them from the cold. If a decrease in temperature is not expected, there is no need to cover young shoots with soil so as not to slow down their growth.
- The second hilling is desirable during the period of tuber formation. This is about 2-3 weeks after the first, before the flowering of the culture.
- The third procedure for caring for potatoes can be carried out when the bushes grow about 25 centimeters. It is not necessary to completely fill them, it is enough to sprinkle the base. You can also throw some dirt between the branches of the bushes so that they grow wider.
When a color appears on a crop, you need to be very careful to huddle or weed the crop. During this period, tubers begin to set and they can be damaged.
How to hud potatoes by hand: process features
 Before you start hilling the potatoes, you need to pull out all the weeds on the site. The grass can not be removed, but left on the ground. When dry, it will be an excellent protection from the sun's rays. It is best to do potato care procedures not in the middle of a hot day, tormented by thirst, but to do it early in the morning or in the late afternoon with a decrease in sun activity. Indeed, in any case, when hilling, you slightly disrupt the plant system, and it can wither.
The basic rules for understanding how to huddle potatoes will be described below. For manual hilling of potatoes, you do not need to have supernatural abilities, it is enough to have a hoe or hoe and be able to use them. The boot is the most popular tool used by gardeners to care for plants.It can be trapezoidal, triangular, have sharp or rounded edges.
There are at least two ways to manually huddle potatoes:
- The first method is to rake the soil to the bush from all sides. Thus, one "bouquet" of stems is obtained.
- According to the second method, the stems must be pushed apart in different directions and only after that the soil must be poured into the middle of the bush.
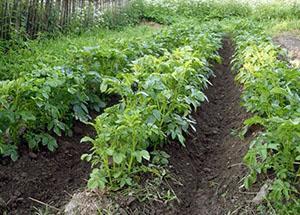
When hilling, make sure that the mound is wide and high. In this case, the tubers will be spacious, and they will be able to grow more and more widely.
Care of potatoes with the manual tiller
 The manual tiller is the most affordable and convenient device for caring for this crop. You can buy a manual potato hiller at a hardware store, or you can make one yourself. This device is used for soil cultivation between the beds. Its construction is very simple. It consists of a shank - a handle and two dumps, on each of which a torso is attached, located at an angle of 45 degrees to the ground. To carry out the procedure, it is enough to pull the device forward, holding on to the handle, and adjust the blades in the desired direction.
 So, making a potato tiller with your own hands is quite simple. To manufacture this device you will need:
- Hollow tube (length 90-100 cm, diameter 1 inch).
- Hollow tube (diameter - ¾ "), designed for the manufacture of traction: rear and front.
- Millimeter steel sheet to manufacture dumps.
- Blowtorch to heat metal for bending.
- Lanyard.
- Grinder in order to process joints.
- Welding machine.
To make a potato hiller with your own hands, you need:
- Make an upright strut, back and front rods. This step consists of making a bend of a 100 cm pipe about 30 cm of that pipe. It is optimal to do it with a pipe bender. The manufacturing process of the front and rear links can be better understood by watching the dedicated video.
- Make a double plow. You will need two concave round plates to make the dumps. These discs need to be set at a specific angle and connected using a welding machine.
- Make a pruning knife. This stage is very important in the manufacture of a hiller, since it is the knife that assumes the main resistance when the plow is plowed into the soil. The sheet of steel should be cut in the shape of an arrowhead with an acute 45 degree angle, then welded to the bottom of the rack and sanded.
Hilling potatoes with a walk-behind tractor
 Today, to facilitate the care of potatoes and accelerate the hilling process, you can purchase a special walk-behind tractor... The advantages of the walk-behind tractor are its versatility: from loosening the soil to harvesting. The disadvantages of this device include its high cost, as well as an increased likelihood of damage to potato tubers.
In the case of processing potatoes with a walk-behind tractor, you need to make sure that the distance between the rows is fixed and the same during planting. To do this, it is recommended to use a special marker and use it to draw lines on the beds.
To carry out hilling potatoes on a walk-behind tractor, the following are installed:
- Two openers on the front of the device.
- Hiller behind, which is intended for filling potato bushes with soil.
It is important to note that to care for large plantings of potatoes, you can use three-row nozzles, which will simultaneously spud three rows of potato bushes. Each gardener decides for himself how to care for the plants: spend little time and a lot of money on it, or vice versa.
To increase the efficiency of caring for this garden crop, it is advisable to first watch a video on how to properly huddle potatoes, regardless of the chosen method of hilling.
At a summer cottage on two or three acres of potatoes, it is not necessary to use a hiller. Here you can know each plant by sight. Usually I try not to spare the land between the rows. In a row, I plant soot more often, leaving 70-80 cm aisles. The first hilling is more like loosening the earth, because the plants are just emerging, and loose soil is scooped up a little. The second hilling after two weeks is already loosening with a hillock on both sides of the bush, so that a small groove remains at the base of the plant. The third time with a hoe is already difficult to pass, you can damage the tops. I loosen the aisles with a narrow spatula, while increasing the strokes on the rows of potatoes. After such a triple treatment, there are no weeds, and the potato bush freely spreads its branches. It remains only from time to time to go through the planting and if leaves with phytophthora spots appear somewhere, remove the bush so that the infection does not spread. In the fall, the potatoes lie in a row in a continuous ribbon, as the stolons of one bush ran away to visit another. The higher the stroke, the better the yield, in any given year.