How to transplant and propagate homemade asparagus
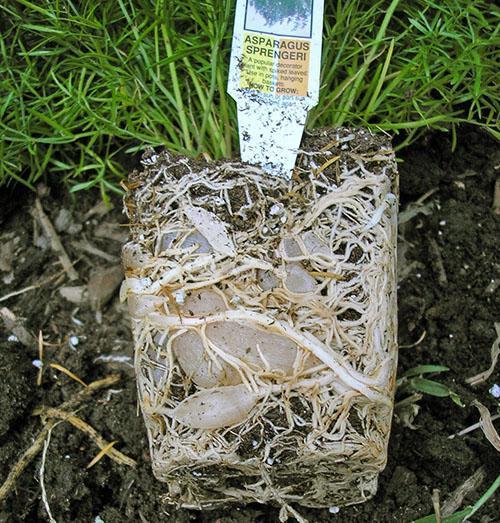
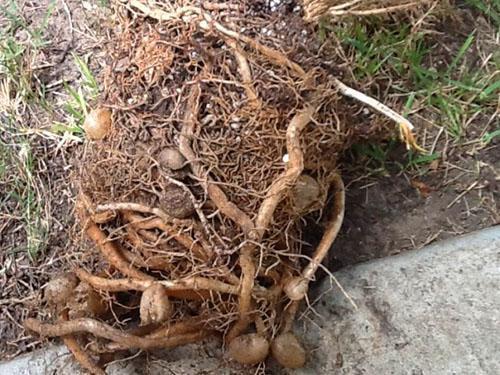
 Among indoor plants, asparagus stand out for their unpretentious disposition, longevity and a very rapid growth of the root system. If you look inside the pot in which the homemade asparagus grows, you can find a tightly entwined ball of a mass of oblong succulent tubers and thin connecting roots.
Thanks to this structure of the root system, the plant is able to store nutrients and moisture for future use, waiting out periods of drought, and also with good care, it can grow and multiply quickly.
Asparagus transplant

Until the roots and tubers of the plant fill the entire container, you should not wait for the growth of greenery.
This behavior is common to all varieties of domestic asparagus, whether it is a young seedling recently obtained from a seed, or an adult perennial specimen. Therefore, when choosing a pot for asparagus, you should not stop looking at a large container in the hope that it will be enough for the plant for many years. It is more correct that the diameter of the new pot is only a couple of centimeters wider than the previous one. Moreover, young asparagus, up to 4–5 years old, are usually transplanted annually, while older specimens can be transplanted no more often than after 2–4 years.
The frequency of transplants directly depends on the condition of the pet and the amount of soil remaining in the pot, which the growing asparagus roots mercilessly push out of the volume of the pot assigned to them.
Despite their endurance, not all asparagus painlessly transfer the transfer to new dishes, therefore, having noticed that the plant does not suffer from a cramped pot, it is better to abandon the transplant, and, if possible, add fresh substrate and feed the homemade asparagus.
But there are situations when you cannot do without asparagus transplantation. This procedure is necessary if the plant has just been purchased and is in a transport container with a small amount of peat filler.
In this case, it is necessary not only to transfer the plant to nutritious loose soil, but also to pre-rinse the crown with warm water. Such a shower will help wash off the wax-like substance from phylloclades, which is used to treat asparagus before sending it to the retail network. The tool protects the crown from moisture evaporation and loss of decorativeness, but if it is not removed, it will lead to rapid shedding of homemade asparagus.
 If a plant is transplanted with roots sticking out of the drainage holes, it is easy to damage the root system, which will lengthen the acclimatization period and complicate rooting. Watering the asparagus out of the pot will help. To do this, the earthen lump is thoroughly moistened, making sure that the water soaks it entirely. This can be done in several steps, constantly draining the water that has got into the sump.
Wet roots are more elastic than dry roots, so they are not only easier to remove from the pot, but also easier to untangle. This is especially important if the asparagus transplant is combined with dividing the plant into several independent seedlings:
- Before transplanting, all old stems that begin to turn yellow or dry are removed from asparagus.
- A small amount of soil is poured onto the drainage layer, on which an asparagus plant is placed, the roots of which can be sprayed with warm water.
- The gaps remaining on the sides are covered with a substrate, from which the top layer is then made.
- After that, the asparagus is watered and, if necessary, mulched with a small amount of the substrate.
Homemade asparagus soil
 The best time to transplant asparagus at home is in spring. A plant that starts a new growing season will easily tolerate the procedure and will quickly start growing.
An indoor flower, unpretentious to the composition of the soil, can grow in nutritious, organic-rich, loose soil.
As such a substrate, you can take a mixture:
- 2 pieces of garden land;
- 1 part of humus;
- 1 part sand, which can be replaced with perlite or verticulite.
If the soil is mixed independently, it is important to disinfect and sterilize all components of natural origin in order to prevent pests and pathogens from entering the pot with asparagus.
When the necessary components are not available, they can be replaced by a universal soil for indoor plants with a small addition of perlite. When transplanting asparagus, one must not forget that the plant needs drainage, which is made from fine expanded clay or gravel.
 Sooner or later, a growing pet will make the owner think not only about how to transplant, but also propagate homemade asparagus. Most often, for this purpose, an adult bush is divided during transplantation, but if you wish, you can get young plants using cuttings or seeds.
Reproduction of asparagus by dividing the bush
 A method such as propagation with tubers or asparagus roots has many advantages. First of all, by dividing the common root system, you can quickly get several independent plants with their own roots at once.
 The acclimatization of such asparagus takes much less time than it takes for an asparagus propagated by cuttings to take root or waiting for seedlings to grow.
The soaked earthen lump is removed from the pot, after which the soil remains are removed and, if necessary, additionally wetting the asparagus roots, the bush is divided into separate seedlings. Be careful with this procedure, as many asparagus species are prickly and can damage the skin on the palms.
The main thing is that all parts intended for reproduction of asparagus have healthy roots, as well as at least one growth point.
When this work is done, the plants are planted in pots prepared in advance for asparagus with an equipped drainage layer and a nutritious soil mixture. After transplanting, the asparagus is watered and placed in a shaded place where drafts and direct rays of the sun will not damage the pet.
Acclimatization takes about a month, during which the plant is moderately watered, but do not feed, so as not to burn the damaged roots.
Propagation of homemade asparagus by cuttings
 You can get cuttings suitable for propagation from the asparagus plant from the end of February to June. The timing is determined by the fact that the active vegetation of the flower begins in spring, and at least one and a half months is needed to root the shoot. It is convenient to cut off shoots during the spring transplant, while it is better to pay attention not to young phylloclades, but to last year's ones. For rooting, cuttings with a length of at least 10 - 15 cm, without signs of disease or wilting, are suitable.
Cut shoots are dropped into a mixture of wet sand, perlite and peat. The volume of the pot for asparagus should not be large, for the first time, containers of no more than 100 ml are quite suitable. So that moisture evaporates less from the surface of the substrate, containers with cuttings intended for propagation are covered with bags or plastic glasses.
It is better if, for rooting, the cuttings are placed on an illuminated windowsill, where there is no direct sunlight and drafts. The temperature for this time should be between 20-22 ° C.The soil is regularly moistened with a spray bottle, and the plantings are aired daily, trying to avoid condensation.
Asparagus roots appear within a month, which is clearly noticeable if the cuttings are planted in transparent cups. After that, a viable plant can be transferred to a permanent residence.
Reproduction of homemade asparagus by seeds
 For sowing, not only seeds purchased in a store are suitable, but also obtained independently, as a result of artificial pollination of white small flowers of asparagus.
In the first case, it is extremely important to pay attention to the shelf life of seeds that are rapidly losing germination. But fresh seed directly from the bush rarely fails and sprouts quickly, but, unfortunately, does not retain parental properties if the propagation of asparagus of hybrid origin is carried out.
Black rather large seeds are planted in the ground in February or March, after soaking for 24-48 hours in warm water. And then the swollen asparagus seeds are laid out on the surface of a mixture of moistened peat and sand and sprinkled with a small amount of the same substrate.
To keep the crops at constant humidity, the containers are covered with foil or glass and placed in a dark place:
- The optimum temperature for hatching asparagus seeds is 18-23 ° C.
- To prevent the formation of mold and soil acidification, the seed-propagated asparagus is aired daily.
- Watering is carried out by spraying, which will not erode the soil and damage the root system of the shoots.
 Seed-propagated asparagus shoots appear in 20-40 days. And as soon as green needles become visible above the surface of the soil, the plant needs to be transferred to light. And if necessary, he is provided with additional illuminationso that the sprouts are not overly elongated and weak.
After a month, when small plants obtained from asparagus seeds reach a height of 10 cm, they can be dived into small pots, and after another 120 days - into pots for adult plants.