How to make a backlight for seedlings with your own hands?
 Illumination of seedlings is one of the most important issues over which both novice gardeners and gardeners and experienced business executives puzzle over it every year. Additional light is largely responsible for the success of healthy and robust plants.
The advantages of additional lighting are:
- prolongation of daylight hours, which is especially important when growing seedlings early;
- additional light provides all-round illumination of plants, thereby preventing stretching of plants and their deformity;
- providing plants with the necessary spectrum guarantees their gradual development to adult crops.
Practice confirms the need and importance of supplementary lighting of seedlings of all cultures. The best way to highlight seedlings is a more complex and multifaceted question.
Plants that were regularly highlighted grow more hardy, strong, strong and resistant to pathogens of various infections, and the yield per plant also increases.
The backlight feature is the maximum approximation of lighting to the natural spectrum of sunlight.
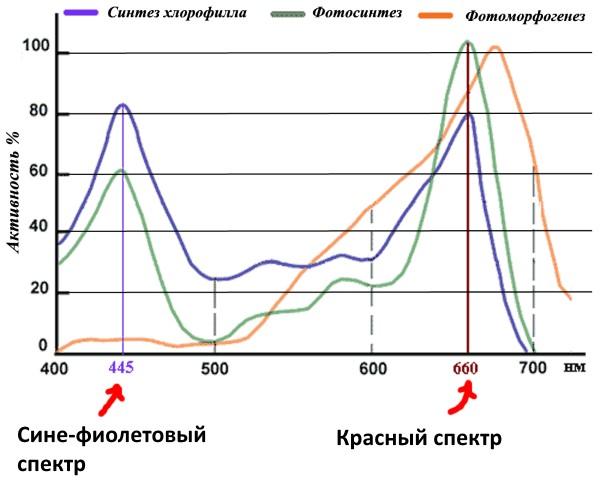
The most important spectra in the beam are red light, which is responsible for plant growth and development, and blue, which ensures proper cell development. With this in mind, it is recommended to select light elements in these two spectra.

In this graph, we see that in the red spectrum photomorphogenesis (fruit formation) is maximum! This should also be taken into account when designing lamps for seedlings! Pay more attention to the red spectrum!
The main ways to highlight seedlings at home
Among the options for organizing the backlight presented to date, the following methods are distinguished:
- lighting for seedlings on the windowsill without lamps;
- additional lighting of seedlings with various types of lamps.
Each method has its own advantages and disadvantages, which largely determine the field of application of a particular lighting option.
Illumination without the use of lamps
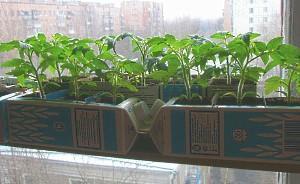
 For the organization of lighting on the windowsill, a simple construction from a cardboard box is often used. The top and side of the box are removed, small sides are left. This whole structure is covered with foil and installed behind the plants. Sunlight entering through the window falls on the foil and reflects on the plants, providing all-round illumination of the crop.
This method is affordable and economical, but at the same time it is quite effective. However, a significant drawback does not allow the use of such a technique for large plantings - in cloudy weather or on the north side of the house, there is not enough light and the foil will not be able to compensate for the darkening. In such cases, you cannot do without lamps.
Lamps
 Making a backlight for seedlings with your own hands is not difficult. For this it is enough:
- organize space - free up windowsill, make tables in the room, build a shelving unit;
- provide fixtures for lamps - various hooks, homemade "ears";
- run a wire from a stationary electrical network or a generator set.
The most important process in setting up a backlight is choosing the right lamps. Gardeners in their experiments use:
- High pressure sodium lamps... They provide stable warm light, which has a beneficial effect on seedlings, but at the same time lamps require additional equipment (power regulators), and also have an unnecessarily high price, which is incommensurate with the yield of the average gardener.
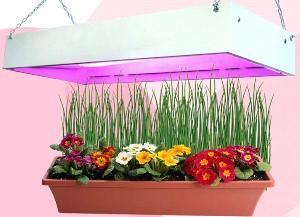
- Phytolamps... An excellent solution for illumination - the spectrum of violet-pink lamps is ideal for plants, but very harmful to humans, therefore it is recommended to supply such lamps with a special reflector.
- Sodium metal halide elements... It is also a fairly affordable and effective way of additional lighting of premises, but still there is very little blue in the spectrum, and therefore the plants develop and hatch with difficulty.
- Fluorescent lamps... These fluorescent lamps are good in many ways, but still their light is too cold, and therefore poor in red spectrum.
- Classic incandescent lamps... They are some of the most useless for supplementary lighting. Bulbs are more suitable for heating a room, rather than lighting it.
- LED lights... These types of lamps are one of the most promising available and have a number of features that are worth talking about separately.
Benefits of LED seedling lighting
Illumination of seedlings with LED lamps gives the gardener and plants a number of undeniable advantages that are worth mentioning:
- when creating a lamp, you can combine the two most important spectra - blue and red - and create an ideal seedling lamp;
- LEDs are quite affordable, and their low cost quickly pays off;
- LED lamps consume a minimum amount of electricity, but give out a sufficient amount of light - up to 6000 lux required for the normal development of plants;
- ease of installation and ease of operation have won the love of millions of gardeners.
LEDs are modern materials that are actively used in everyday life and in production. It is quite effective to use LED lamps on the seedling racks - they illuminate the area well and do not heat the air.
 To make an LED lamp, you don't need to have special skills or special knowledge.
To create a LED strip lamp you will need:
- red and blue LEDs;
- thermal paste, it can be replaced with hot melt glue, but it is more expensive;
- base - a piece of aluminum, a profile from furniture, any available material up to the old ruler;
- driver or power supply - it provides current stability and the required voltage;
- cord and plug.
For optimal illumination of the seedlings, it is recommended to alternate the LEDs on the strip in a sequence of 2 red and 1 blue element.
They are connected to each other by soldering and lead to the driver, which is respectively connected to the switch and plug. The tape is attached with bolts, double tape or rivets to the prepared surface. After that, it is assembled into a single circuit with a driver, cord, switch and plug.
Illuminated seedling rack
The construction of the rack will not take you much time, but it will significantly save on space for seedlings by placing containers with soil and seedlings in several tiers.
For the manufacture of a rack, both a metal corner and a wooden beam treated with stain or pickled from parasites can be used. Self-tapping screws or bolts are used to fasten materials together.
The design is extremely simple - shelves with hollow compartments for boxes. The length and width of the rack directly depends on the size of the seedling boxes. It is recommended to install no more than 3 rows in height. Each row is illuminated by its own lamp, fixed to the bottom of the top seedling box.
What is the best lamp to illuminate the seedlings, each gardener decides for himself. Someone loves fluorescent lamps, while others consider LED bulbs to be the best.Conduct experiments and watch your pets, find a comfortable way to grow seedlings. After all, gardening is primarily a pleasure!
Video: the benefits of LED seedling lamps
In this video, an experienced gardener Valery Medvedev conducts an experiment with seedlings, and proves that LED lamps for seedlings are the best choice!
Presumably, such illumination is also suitable for supplementary lighting in winter? For the "kitchen garden on the windowsill"?
I have FOTOLIZ-20/400-B lamps for supplementary lighting of violets, archideas.
They are specially designed for indoor plants and to stimulate the flowering process - Buds.
For seedlings of peppers, tomatoes, petunias and strawberries, I use PHOTOLIZ-20/400-L. These lamps influence the correct formation of the green mass - the Leaf.
I think, to equip your greenhouse with these lamps, but with more power. The neighbor put on an experiment, the effect was in the form of a greater return on the harvest of peppers.
Good luck with your innovative approach.
Yesterday I bought such a phytolamp on LEDs in St. Petersburg to illuminate parsley and green onions on the windowsill. I think the result will be positive.