What does the roof valley look like and how to equip it
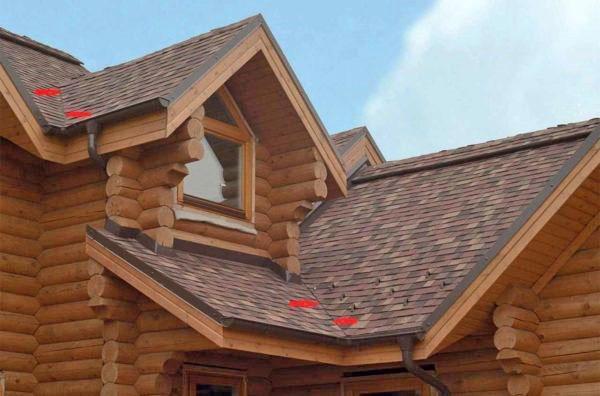
 In modern private construction, the roof of a house performs not only a protective function. A multi-level roof with turrets and slopes adorns the entire building, and the roof valley, that is, the adjoining of two slopes, becomes an object of special attention during the construction, repair and maintenance of the house. The conjugation of the planes has an increased load in the form of snow masses and ice. In these areas, waterproofing is reinforced to prevent leakage.
Roof end: construction and material
In private construction, an aluminum valley is often used - it is a durable and lightweight material. Also, galvanized steel is used to cover this area - a practical solution that ensures a long service life of the entire structure.
The construction involves two layers: the outer valley and the inner valley. The bottom level is set at the joints forming negative corners.
Installation of the outer level is carried out upon completion of the roofing work. You can leave this area open, or you can decorate it with a decorative overlay.
Features of the rafter system of the valley roof

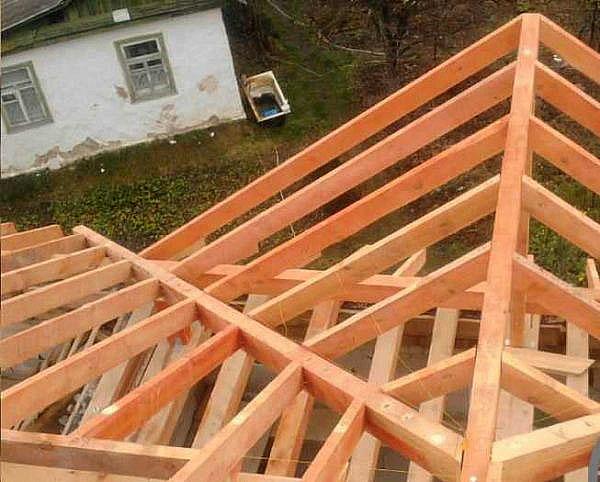
If the line of the valley is not too long (less than 2 m), it is enough to fasten the rafters with nails, and with an impressive length of abutment, this section is reinforced with metal plates.
The lathing on the roof valley must be reinforced, and its structure is determined by the choice of roofing material:
- Lathing for a valley for metal tiles requires the installation of additional intermediate strips, which are mounted between the main ones. As a result, the distance between the planks is half the standard one, and the length of the additional planks exceeds the width of the lower main planks.
- For profiled sheets, ceramic tiles and slates, additional longitudinal strips are required, located along the entire section of the valley. The width of such strips should exceed 100 mm, and they are nailed closely, 2-3 on each side. This creates a strong enough base ready to support heavy roofing material.
- Ondulin requires two boards with a width of more than 100 mm. They are placed at intervals of 15 cm from the axis of the valley. As a result, an opening is formed right in the center, where the valley gutter is laid.
- A soft roof requires continuous lathing on the entire roof, including the valley.
Installation of the valley
The installation of this section depends on the material chosen for the roof covering. Before deciding how to properly make a valley on the roof, you need to choose what it will be covered with.
Metal tile
 The device of a roof valley made of metal tiles involves not only the installation of additional battens, but also the installation of an additional element - a galvanized sheet. It is painted to match the basic color of the roof and is sold in pieces 2 m long. The gutter runs along its fold, and there are small sides at its edges. This is a lower valley that protects the vulnerable area from moisture penetration. This strip is mounted from below, its edge is wound up behind the roof overhang and cut 20 mm below this level. A side is formed from the resulting "tail".
No gap is allowed between the edge and the drain gutter, otherwise rainwater will penetrate under the roof.
The next sheet must be laid on top of the first one with an approach of 20-30 cm. The resulting joint is coated with sealant (bitumen mastic is also allowed). Then more sheets are stacked so that the entire section of the roof valley is protected.
End sheets of metal tiles are attached in one of two ways:
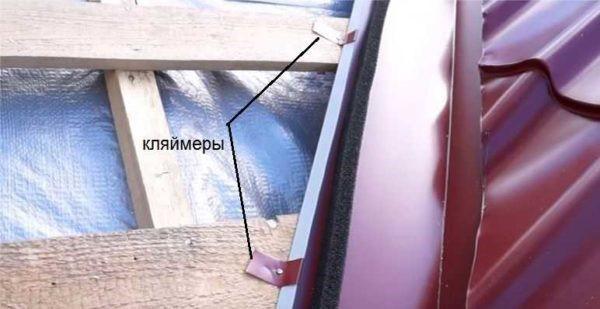
- self-tapping screws;
- clays.
To ensure maximum waterproofing of the valley, clamps are recommended, since when using self-tapping screws, holes are obtained in the roof. Even if they are protected with rubber pads, there is a danger of moisture ingress.
On the fixed strip, it is necessary to attach the sealing tape to the self-adhesive base 20 cm from the bend. A metal tile is mounted on top. It must be cut off before reaching the center of the valley 60 mm.
When all the sheets of covering are fixed, the process of laying the valley is considered complete, but some owners are not satisfied with the appearance of this area, so they cover it with a decorative overlay. This is the upper valley, which not only protects the joint, but also decorates the roof.
Decking and slate
 Under the roofing of these types along the entire section of the valley, it is required to lay additional sheathing boards, on which a waterproofing strip is laid, fixed with a membrane. The joints are overlapped by 10-15 cm, and double-sided tape connects them.
A combination of sealing tape and sealant is allowed, which must be laid on both sides of the bend of the roof. The gap that is obtained after installing the roof will be filled with sealant to prevent water and snow from entering.
When the roof is covered with corrugated board, there are several methods available on how to install the valley:
- Open option when the bar is not covered. Before reaching the 60 mm fold, the roofing material is cut off. To hide the strip and cuts, a decorative groove is attached to the crate.
- Closed version, when the cover sheet is cut directly at the joint line. Since the sheets fit tightly to each other, a gap between them is not formed and does not require additional decorative elements.
- A bound version, when sheets of material, each coming to the other side in turn, overlap the area. Valley nodes from professional sheet with a weave look attractive, but it is difficult to carry out and is available only in the case of a soft type of roofing.
Ondulin
 When using this roofing, the lathing in the roof valley section is not continuous, since there is a gap of 15 cm between two adjacent strips (each on its own side of the joint). It is here that the grooves on the roof are laid. Their installation is carried out in several sheets, which are stacked alternately, starting from the bottom. The first is laid flush with the edge of the roof and nailed to the crate. The second sheet overlaps the first overlap by 15 cm.
When the entire length of the gutter is covered, the installation of the roofing sheets begins. The material is cut with a margin of 5-6 cm in two stages: first approximately, then exactly. The laid sheets are fixed with roofing nails with a large cap, which has the color of the roof.
Dormer window decoration
 The shape of the dormer can be triangular, hip, arched, or some other type. It is intended to illuminate the under-roof space and exit to the roof. The endowa on the dormer window requires reliable protection from moisture, therefore, waterproofing and sealing should be strengthened.
This area requires special protection of the roof valley: the installation scheme depends on the choice of roofing material and the configuration of the dormer.
Often preference is given to ondulin, which fits as follows:
- The width of the lathing under this material is at least 30 cm.
- Installation of the cover is carried out up to the upper level of the dormer, reaching the slope.
- Ondulin is laid on the joint section over the roof of the dormer.
- The ventilated aggregate is placed between the roof and the valley.
- The lower part of the valley cover is attached to the lathing of the dormer.
- The number of valleys depends on the width of the dormer. If it exceeds 1 m, installation of two or more valleys is required. They are laid with an end overlap of 15 cm, and the overlap is protected with mounting tape.
- A cover apron protects the bottom of the window. The joint between the apron and the window is also covered with mounting tape.
It is necessary to properly protect the valleys from all sides from the skylight to prevent moisture penetration.
 When designing and building a private house, you need to know what roof valleys are and how they are mounted. The installation mechanism depends on the roofing material, but there are some common features, for example, strengthening the battens and waterproofing. A reliable valley is a guarantee of long-term operation of the roof and the entire building.