DIY methods of making cement planters
 Garden design is an important step in transforming inconspicuous flowers and plants into a whole work of art. It is not difficult to make a cement planter with your own hands - a master class will allow you to master the technique of making various options. These are a kind of flowerpots for growing flowers. They make the vegetation brighter and more unusual, add sophistication and style to the overall design.
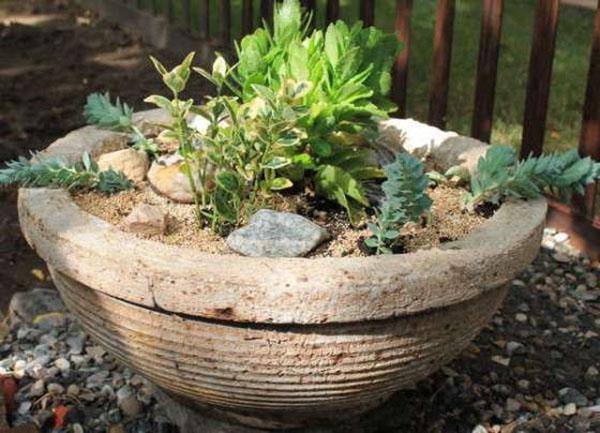
Cement garden planter

To make a large planter or flowerpot, you will need to prepare the following components:
- form from a plastic base, the size of the diameter should be 53 cm, and the height should be 23 cm;
- the solution will require white cement, perlite (agroperlite), high peat;
- oilcloth or cellophane, you need to take a bag or cut that will cover the entire surface of the plastic container;
- metal wire frame or reinforcing structure;
- cleaning brush.
To make a pots of cement with your own hands, it is worth considering a master class, which is held in several stages:
- First you need to make a solution. It will require 2 parts of white cement, one part of perlite (agroperlite) and two parts of high-moor peat. For measurements, it is better to use a bucket with a volume of 1.5 liters.
- Further, dry components are poured with water and stirred until a homogeneous consistency with a dense structure is formed.
- We cover the bottom and walls of a plastic flower pot with cellophane or film. It should completely cover the container to the very top.
- When spreading the cellophane, it is important to straighten it, it must be even, otherwise incomprehensible folds and bumps will remain on the finished product.
- First of all, we spread the solution on the bottom of the pot, level it well. The thickness of the layer should be 4 cm, you can control it with a match or a toothpick.
- To make the structure strong, you need to install a metal wire frame or reinforcing structure.
- Since the product should turn out to be large, the solution will need to be kneaded fractionally, in parts. In general, it will take about 4-5 batches.
- It is imperative to consider the drainage hole. To do it, you need to put a cork on the bottom, which is previously wrapped in a film.
- After the entire surface of the container is lined with cement, everything is covered with foil and left to stand for about 10 days. During this period, the cement mixture will harden and gain strength.
- If the surface dries out, then it needs to be slightly moistened.
- After about 8 days, it will be necessary to check the readiness. To do this, the surface of the cement needs to be tapped a little, if the sound is not muffled, then the pots are removed from the container along with the film;
- Next, the surface of the product is cleaned with a metal brush.
If you want to make a colored planter, then you need to purchase special dyes for this. To do this, each part of the cement is painted in a specific color and laid out in parts.
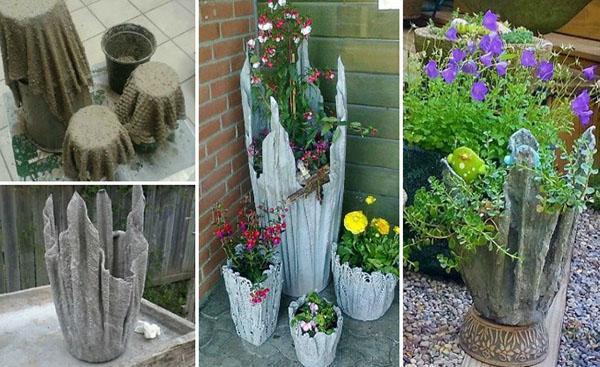
How to make a planter out of cement and fabric
 To decorate the site, you can use a variety of elements - pots, flowerpots, pots.They can be done by hand, the more homemade products are bright and original. For this reason, you definitely need to know how to make a planter out of cement and fabric. This will allow you to make a real work of art from scrap materials.
 To make a flower pot out of fabric and cement with your own hands, you will need to prepare the following tools and materials:
- The basis for the preparation of the solution. It is better to use the budget option - Portland cement grade M400.
- Blank. Tulle, terry towel, burlap can be used as it. It is advisable to use embossed fabric, it will allow you to make a brighter and more unusual pots.
- Any paint for concrete surfaces. As it can be used acrylic, water-epoxy, polymer, vinyl, acrylic-silicone or lime paint mixture.
- Paint brushes.
- Fine-structured polyethylene packaging film. A simple stretch film can be used as this component.
- The form in which the pots will be made from rags and cement with their own hands. A conical bucket or any other container that has a conical and pyramidal shape is perfect for this.
- The container in which the cement will be mixed.
- To stir the solution, you can use an electric drill with a mixer attachment.
 The process of making pots out of cement with your own hands does not have any particular difficulties, a detailed master class will help with this. It consists of several stages:
- Pre-form for pots, it is recommended to completely cover with foil. This is required for the convenience and ability to remove the finished cement product.
- A solution of cement is made in a container. First of all, water is poured, cement is poured into it. Using a drill with a mixer attachment, the solution is mixed.
- The finished solution should not turn out too thick, in consistency it should resemble something between milk and sour cream.
- The fabric is dipped into the solution, it should be completely immersed in the cement base.
- It is better to leave the fabric in the cement for a while so that it is well saturated.
- Next, the workpiece is removed from the solution and thrown onto the bucket. The edges should be straightened, you can create folds to make the pots brighter and more original.
- After about 3 days, the pots can be removed from the container.
- The surface of the product can be painted with any paint that is intended for concrete.
Shoe-shaped flowerpot
 It is worth noting! On the site, a pots in the form of a shoe will look beautiful and unusual. It will add sophistication and grace to the vegetation, and the garden will be transformed beyond recognition. Of course, making it takes time and effort, but the result is worth it.
To make a pots in the form of a shoe, it is worth preparing the required elements and materials:
- plastic cans;
- threads with a thick structure;
- self-tapping screws;
- wide adhesive tape or tape;
- PVA glue;
- several packs of newspapers;
- the basis for the solution is cement and sand;
- water;
- egg trays.
If you do not know how to make a shoe of a planter out of cement, then the master class will be able to provide a quick and easy mastering of the manufacturing technique. Moreover, on the Internet you can find a detailed video describing the process.
 So, all work consists of several stages:
- for work, you will need two cans of 10 liters and one for 1 liter;
- cut off along the lines drawn on the canister, and leave one intact;
- we install the other on the side of one canister and fix it with self-tapping screws, and then wrap it with tape;
- further from the bottom of the structure, it is required to make several holes, this is necessary to ensure drainage;
- using small pieces of newspapers, PVA glue and papier-mâché technique, we give the product the shape of a shoe;
- then a solution is made, it is made from 1 part of the mixture, 3 parts of sand and water, stir well;
- after the newspaper mold is ready, we screw in self-tapping screws on its entire lower surface on both sides and tighten it with threads, this will ensure the best stability of the cement mortar on the mold surface;
- the form can be pre-treated with a primer;
- then we apply cement on all surfaces and level it well, leave the product until it dries completely;
- after the shoe is dry and strong, it needs to be sanded;
- at the end we paint it with a special paint for concrete.
The finished pots in the form of a shoe can be used as a decoration for a garden plot. He will give it brightness and positive notes. Vegetation in it will look stylish, elegant.
Making flowerpots out of cement and rags is a fun activity that will entice many. This product can be made by everyone, even those who have never made structures of this type before. The main thing is to carefully study the instructions and basic manufacturing rules.