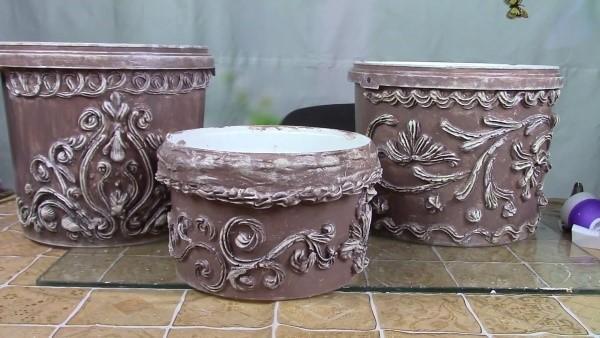
Antique pots from a plastic bucket - give a second life to unnecessary trash
 Today, almost everyone uses water-based paint for repairs, which is sold in a plastic container, and a lot of it is collected at the end of the work. Do you know what a fabulous flower pot can be made from a plastic bucket? This is a good way to give your flowers an original pot, and at the same time to put things in order in the pantry.
What you need to work
So, for the manufacture of pots we need:
- directly the bucket itself;
- alcohol-based liquid for degreasing;
- sandpaper;
- primer;
- pastry bag with attachments;
- stencils (not necessary if you can draw the picture yourself);
- gypsum putty (finishing);
- PVA glue;
- glycerol;
- acrylic paints;
- acrylic lacquer.
The bucket can be of any size and not just paint. The main requirement is that it should not be too soft.
Planters from a plastic bucket: sequence of actions
The first step is to prepare the bucket. We remove the lid and handle (we do not need them), and degrease the outer surface of the container. Then we carefully pass along the walls with sandpaper, sanding them. This is necessary for the finishing layer to adhere as best as possible. Three in different directions until the glossy shine disappears. Then we go over the bucket with a primer.
You can prime it with a special primer or acrylic paint.
The surface is now ready for further work. We start decorating the pots to give it a volumetric shape:
- We put the bucket on its side and fix it on both sides so that it does not roll.
- We apply a stencil and a sponge dipped in any dark paint, go through it. The drawing should be transferred to the bucket. You can draw your pattern with a pen or pencil, if you know how. Or translate a drawing from a sheet through a carbon copy.
- We dilute the putty by adding a little glue to the mixture. You should get a fairly thick consistency that keeps its shape. At the end, add about 1 tsp. glycerin so that the mixture does not stick to the walls of the bag during operation. Mix and place the mixture in a pastry bag.
- We put on the nozzle and begin to trace our drawing on the bucket along the contour. The attachments can be changed to make the lines thinner. If something doesn't work out, you can always fix it with a toothpick.
If you plan to decorate both sides of the planter from a plastic bucket, do it in turn. First, apply the pattern to one side and let it dry, and only then proceed to the other side.
Now you need to let the putty harden. Leave the planter in the sun for a day. When everything is dry, paint the entire bucket first with one color of your choice, for example, brown-chocolate. After drying, walk with a sponge dipped in light paint along the bulges, giving volume. It remains only to cover the pots with varnish (glossy or matte, as you like), and beautiful, semi-antique, pot ready.