Correct spathiphyllum transplant after purchase
 Indoor flowers live constantly in conditions that only remotely resemble natural ones. Therefore, the decorativeness of a plant depends on many factors. Spathiphyllum transplant is a mandatory technique in captivity. The root system requires nutrition, and in a cramped bowl, light, infertile soil is unable to feed the plant for a long period. When transplanting a plant and reproducing it, certain rules must be followed.
Conditions for the care and transplantation of spathiphyllum at home

 A necessary operation to transplant spathiophyllum at home and care before rooting is considered:
- the plant has grown so much that when the leaf plates are pushed apart, it can be seen that the lower leaves die off from lack of nutrition and lighting:
- a new flower purchased after greenhouse maintenance, bought at a flower shop;
- annual transshipment of young plants into a large container;
- the plant got sick, root rot or insect pests were found;
- reproduction of plants.
How to transplant spathiphyllum at home, how to create conditions for the early recovery of the plant?
 The soil for spathiphyllum is prepared light with an acidic reaction, but closer to neutral. You can buy such a soil mixture at a flower shop for aroids, or you can prepare it yourself. Weakly acidic components are leafy earth, peat and added coniferous bark. Sand, turf and charcoal are neutral and help to average the composition to slightly acidic, close to neutral.
The composition of the soil for spathiphyllum and the choice of dishes:
- turf land - 2 volumes;
- sheet, peat, sand - 1 volume each;
- ceramic chips, charcoal, bark - 0.5 volume each.
You will need pebbles or expanded clay for the drainage layer in the planter. The created soil must be steamed, treated with phytosporin. To restore useful microflora, 2 weeks before planting, moisten the mixture with EM-1 and place in a dark place.
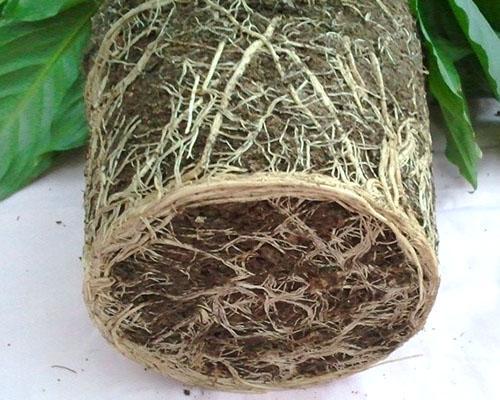
 For transplanting an adult plant, a container is selected that is larger than the previous pot by one size or 1-2 cm.It should be borne in mind that painless transfer is carried out up to a container diameter of 20 cm, later they try to remove the upper loose layer and add fresh nutrient mixture. Root tightness is a must for flowering. A sign of the necessary change of dishes is a beard of yellow roots of spathiphyllum, which has crawled out of the drainage hole.
Transfer or transfer, the right choice
 We know that transshipment is a method of changing a container without disturbing a clod of earth connected by roots. In this case, the plant is abundantly moistened, but not so much that the earth turns into mud. It is enough for it to slip out of the cramped pot easily like clockwork without damaging the roots. Visually making sure that a hundred roots are healthy, leaves without signs of disease, the plant is neatly arranged in a large bowl.
At the bottom of the new container, a drainage layer of 2 cm, 2 cm of soil, and an intact clod of earth with roots is placed on top, having previously selected pebbles and expanded clay from the lower beard. On the sides, soil is poured for spathiphyllum, it is slightly compacted, slightly watered. When wet, the earth will settle, it must be added to the neck. Shake the pot a little, make sure that the plant does not fall over, stands in the center. For several days, the new plant should be sprayed over the leaves, but not watered. The plant will quickly take root if you arrange an inverted plastic bag on top, in the form of a mini-greenhouse.
If you really need it, then you can also handle a flowering plant, but a spacious pot will create conditions for the cessation of flowering.
 If the plant is newly acquired, then is it necessary and how to transplant spathiphyllum after purchase? Yes, it is, but only after preliminary quarantine for 2 weeks. The soil on which the plants for sale are grown contains a lot of peat and is filled with nutrients only for the first time. Therefore, as far as the root system allows, you need to carefully clean it from the substrate and put it in the desired composition.
 In the same way as during transshipment, a layer of drainage and earth is prepared, roots are placed on it and carefully sprinkled with soil for spathiphyllum, with gentle shaking to compact. The sprinkled roots are moistened, the soil tightly fits the roots, the earth is again poured up to the neck. In this case, about 2 cm should remain to the edges of the pot. The plant is checked for planting density, slightly rocking and controlling so that it does not fall over.
But such a transplant of spathiphyllum requires careful observation for 2 weeks and frequent spraying of the leaves. A sealed hood over the plant will keep moisture and promote rapid establishment.
The only way to revise the roots is to transplant. Therefore, each copy must be checked for rot, cut out damaged and doubtful places, sprinkle the wounds with crushed charcoal and dry it a little. At the same time, young leaves are also removed, they will still die.
 In order to plant spathiphyllum thickets, you will need to completely immerse the plant in a container of water and let the earth turn into mobile mud. After that, extract the plant, and, spreading out on a horizontal plane, select young plants, cut the rhizomes of the old so that there are up to 5 leaves together with the root.
 Plants that have a root system can be planted directly into containers. If there are no roots on the layers, they must be germinated in a glass of water. Transplanting spathiphyllum during reproduction is no different from how to transplant spathiphyllum after purchase.
 In all cases of transplanting and transferring, the plants are not watered until new leaves begin to appear. This means that the plant is rooted, and moisture will not harm it, and rot will not appear.
useful!
Thank you so much. Everything is very detailed and interestingly written.