Video and description of the process of transplanting zamiokulkas at home
 Zamioculcas is popular with flower growers due to the friendly growth of dense green foliage and undemandingness, but transplanting can become a serious stumbling block. A video on how to transplant zamioculcas at home will help to avoid mistakes and quickly master a complex, but necessary procedure for a plant.
The difficulty of transplanting a culture that has fallen on window sills from Africa is that under the surface of the soil, zamiokulkas hides not only tubers, but also powerful juicy rhizomes. Damage to them during transshipment or division of the bush can cause a long and painful acclimatization, root rot.

- by the timing of the transplant;
- the composition of the soil;
- the size and even the material of the pot.
So that, with proper care of zamiokulkas, a transplant at home does not lead to sad consequences for the plant and the grower, you need to prepare in advance for this process.
Zamiokulkas transplant after purchase
If the zamioculcas is just brought into the house from the store and is in a transport pot, it will have to be transplanted after 2–3 weeks of being in the house.
 There are several reasons for this:
- Young plants planted in a peat substrate in such a soil are easy to pour or, conversely, to skip the moment when the plant needs moisture.
- In addition, there is often no drainage layer inside the shipping container, and its role is played by large holes at the bottom, through which the roots of the zamioculcas can easily penetrate. This complicates care, future transplantation and negatively affects the well-being of the green pet.
A detailed video on transplanting zamiokulkas at home will provide comprehensive material for its implementation. And even an inexperienced florist can easily cope with an important task.
Choosing a pot and preparing for transplanting a zamiokulkas
 If the transplantation of zamiokulkas after purchase is carried out regardless of the season, then it is better to plan a regular procedure at a time when the plant is preparing for active growth. In the conditions of central Russia, this period falls on the spring months.
Transplanting zamiokulkas in the spring allows the tubers to better acclimate to new conditions and, taking advantage of the fresh nutrient substrate, to quickly build up the green mass.
 The transplant is preceded by the choice of a pot for the plant. In the case of zamiokulkas, it is important to choose a container that is suitable in size, but also in material. The strong roots are so strong that they can tear apart a thin plastic container or cause cracks in fragile ceramic or glass.
Clay unglazed pots have proven themselves best when growing zamiokulkas. They are strong enough, but at the same time the porous surface of the clay does not interfere with the penetration of air into the interior and the withdrawal of excess moisture from the soil.
The diameter of the pot is chosen to be slightly larger than the planted tuber. The roots of a plant, which in nature is accustomed to obtaining moisture not in the most accessible places, willingly grow deeper. Before transplanting a zamiokulkas at home, as in the video, it must be removed from the old container without damage.In the case of roots that have grown to a great depth, this will be extremely difficult. Therefore, spectacular tall pots need to be filled at least a quarter with large expanded clay:
- Young zamioculcas are transplanted, or rather, they are transferred without disturbing the earthen coma, every year, consistently increasing the size of the new pot.
- Adult specimens should not be disturbed so often. With age, growth slows down somewhat, so such plants can change their place of residence every 2-3 years as needed.
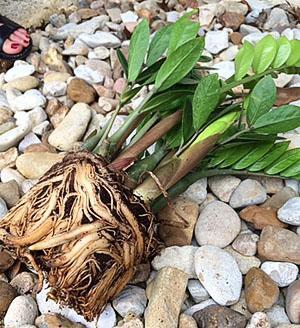
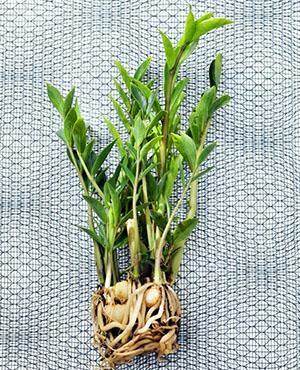
If, when removing a large plant, it is found that the bush consists of several parts formed by separate tubers, it is better to carefully divide such a zamioculcas. It is easier to do this if you rinse the roots by removing the old substrate.
How to properly transplant zamiokulkas, step by step and very accessible video will tell about it.
What kind of land is needed for zamiokulkas
 In nature, zamioculcas lives on stony soils with admixtures of sand and a small amount of humus. The plant has a hard time acquiring nutrients and moisture, as evidenced by the tubers and powerful roots.
What kind of land is needed for zamiokulkas growing in a room pot? In some sources for the plant it is recommended to take mixtures based on humus, garden soil and peat... Such a substrate will give the plant the opportunity to quickly grow the aboveground part, but an excess of nutrition and moisture will lead to a great risk of decay of the root system of zamiokulkas - the main problem when growing this spectacular room crop.
The soil for transplanting zamiokulkas should be moderately nutritious, but at the same time very loose, air and moisture permeable.
 As a ready-made substrate, you can offer soil for succulents. If a universal mixture for ornamental crops is purchased, at least a third of the volume of fine expanded clay, washed river sand and perlite, crushed to small fragments of charcoal and granite chips, are added to it.
How to properly transplant zamioculcas: a step-by-step guide
The easiest way is to transfer the plant. At the same time, there is no risk of damage to the roots, and the zamiokulkas that got into the new soil continues to grow without loss.
 If we are talking about an adult plant, before transplanting zamiokulkas at home, as in the video, you need to clean the root system of the remnants of the old substrate:
- A plant consisting of several tubers and shoots extending from them can be separated and, turning into several independent plants, planted in their pots. This will simplify the care of zamiokulkas and increase the home collection of the florist.
- A layer of large expanded clay is poured onto the bottom of a pre-selected pot with drainage holes to drain excess moisture.
- A little moist substrate is laid on top of it so as to completely cover the drainage and leave room for comfortable placement of the root system of the zamioculcas.
- The filling of the roots is carried out in such a way that the apical parts of the roots and tubers are on the surface of the soil. At the end of the process, the substrate is carefully compacted.
- Expanded clay, pebbles or other suitable mulching material are laid on top of the soil to conserve moisture and protect the soil from excessive compaction.
If you correctly transplant zamiokulkas at home, and then pay a little attention to the plant, it will grow well and please with decorative green foliage throughout the year.