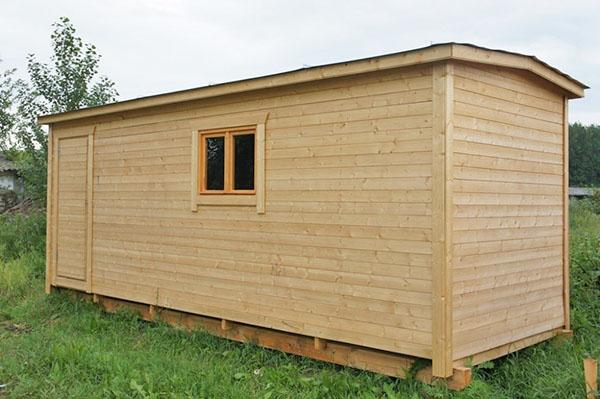
We start the construction of a change house with our own hands at their summer cottage
 After acquiring a land plot outside the city, the question arises of the need to preserve materials, inventory, tools, overnight stays and rest during construction work on the construction of a house. Building a change house with your own hands in this case is an excellent way out.
You can buy a change house, but you will have to be content with the proposed dimensions, although you might like other dimensions of the structure. As a rule, ready-made models are more expensive, and a wooden change house with your own hands will be cheaper and will last longer. It can be designed according to your wishes and requirements, you can choose the location of windows and doors. A change house can be made in one room, or you can make several rooms or with a toilet, shower.
Read also:do it yourself birdhouse!
Where to start construction

We suggest considering step-by-step instructions with a photo of building a change house with your own hands. At the very beginning, you need to decide:
- In subsequent years, will there be a need to transport this structure to other facilities. If this option is possible, then it is better to build a change house next to the entrance to the site.
- In the future, the change house will be used as a storage place for things (bicycles, inventory), as a bathhouse or a summer cottage garden house. Depending on this, the question is decided whether it will be necessary to additionally insulate the room or not.
- What kind of change house to build wooden or metal.
- To plan and draw up drawings of the change house trailer, decide on the materials, make an estimate.
Read also:laying laminate on a concrete floor with your own hands step by step instructions
Foundation laying

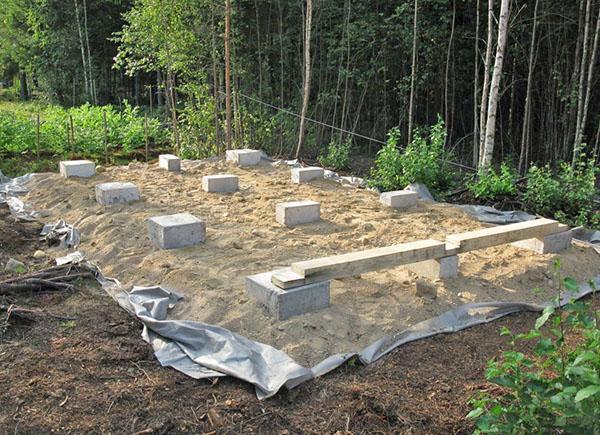
The wooden shed is light enough. If it is being erected for a while, then the foundation is made a simple columnar of cinder blocks or bricks, on a previously cleaned of turf and leveled surface of the earth:
- a recess is made for each pillar;
- create a pillow up to 30 cm from sand or rubble, spill it with water, tamp it;
- stack blocks.
If the structure of a building shed is constructed for permanent use, then foundation it is best made from pipes filled with concrete. In this case, it is important that the lower part of the pipe is in the ground below the level of soil freezing.
Try to observe the gaps around the perimeter between the supports (1.5 - 2.5 m). It is advisable to put them under the bottom of the partitions on which the timber will rest.
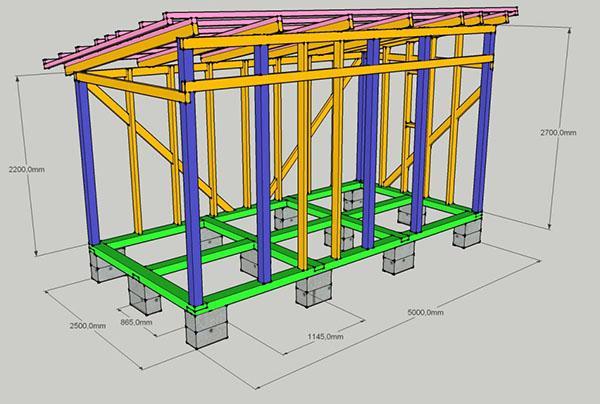
Construction of a change house with your own hands - a wooden frame

The supporting frame of the change house made of wood should be constructed of dry material, pre-treated with antiseptics. The following works are performed step by step:
- The bottom strapping is made from a bar of 100 x 150 mm. The crown of the second is laid from a board 100 x 100 mm. Thanks to this installation, then it will be possible to build an insulated floor. Logs from a 100 x 40 mm board are laid out on the shelves formed between the lower and second crown.
- All racks: corner, bearing and door racks are formed using a board of 100 x 40 mm, and window and intermediate racks are made from a bar of smaller dimensions 50 x 50 mm.
- The racks are attached with mounting corners to the second crown. It is imperative to use a building level - the structure must be perfectly flat!
- The upper strapping is made with a board, its dimensions coincide with the dimensions of the corner posts.Also, after measurements and docking, the frame is fixed with corners.
- The next stage is the assembly of the roof, it can be one or two-pitched. The first option is easier. A harness is set at different levels to adjust the length of the racks.
- Fix the intermediate racks with corners at the top and bottom, after the upper strapping. The distance between the uprights depends on the chosen coating for finishing and thermal insulation. The parameters of windows and doors must correspond to the dimensions of the drawing.
Roof and ceiling

It is better to fasten the rafter system to the upper strapping with strong metal brackets. The roofing cake is collected step by step:
- roll waterproofing is attached to the rafters;
- the crate is laid out;
- thermal insulation, protection from moisture, leakage is made;
- installation of roofing material is in progress.

A necessary step, after roofing work, is the insulation of the ceiling. The following works are recommended:
- waterproofing and mineral wool;
- wood slab or OSB.
One of the most economical options is OSB cabins. A gable roof is perfect for such structures. Roof and walls are quickly and conveniently sheathed with OSB plates. You can even make a door from OSB. After the roof sheathing, the roof is installed. The walls are either painted, pretreated with an antiseptic, or revetted with siding, clapboard as you wish.
The floor and walls of the change house

It is very important to take a responsible approach to the insulation of the change house with your own hands. The floor insulation works are as follows:
- a rough floor of boards is laid between the first and second crown;
- laying waterproofing material;
- produce thermal insulation with mineral wool;
- they lay out the finishing floor in the change house, and what it will be made of is a matter of taste - you can put plywood, linoleum, or laminate.

To make the walls of the change house warm, it is better to resort to a common method of insulation - a sandwich. It consists of several layers: inner and vapor barrier cladding, moisture and thermal insulation, and outer, protective, decorative cladding.
Do-it-yourself step-by-step instructions for building a frame change house are not complicated, but this building will be reliable, strong, and will last for many years.
The final stage of construction is electricity supply, installation of doors and windows.
Metal construction

An alternative to a wooden structure is a change house made of a profile pipe. This option is much more durable, but also more expensive:
- The frame is assembled from profile pipes measuring 6 x 4 cm, which are cut according to the dimensions of the building drawing. Pipes are welded into an edging. The floor of the edging is formed from the same shaped pipes, and under them a floor of galvanized metal is welded.
- Racks are welded, the first at the corners and crossbars. Work is carried out with constant measurements, all corners must be even. Next, intermediate pillars are welded, taking into account the openings of windows and doors.
- Next, the roof frame is made of pipes 4 x 2 cm, welded in the form of triangles, covered with a profiled sheet. Metal elements are coated with a primer, followed by painting.
- The interior arrangement is the same as in the wooden shed. Do-it-yourself modular cabins can always be re-planned to suit your requirements and desires.
Construction trailer
 If there is no time to build a change house, then you can purchase a trailer and convert it into a change house. They have a big advantage - no need to prepare the foundation. It is enough to clear the flat surface of the ground to install the structure. It is recommended to insulate the structure without fail, and all the rest, additional equipment, finishing of the trailer inside - at will.
The most demanded drawing of a construction change house 6 x 3 includes: three rooms, heating, a corridor (dimensions 1.5 x 1.5 m), which serves as a barrier from the cold, a storage room, a toilet (dimensions 1.5 x 1.5 m ).
By following a certain order of construction work, you can easily cope with the construction of a structure on your site. Drawing up a drawing, purchasing materials for an estimate, will help to avoid mistakes.
 Any step-by-step instructions on how to build a 6x3, or 4.5 x 9, or 4.5 x 6 m change house with your own hands are identical to each other, they have the same order of work. The result of the work done will be a high-quality and useful structure that will serve you for many years.