How to make a thermal drive for a greenhouse with your own hands
 One temperature and correct watering for vegetables in a greenhouse is not enough, it is imperative to organize effective ventilation. It is not always possible to independently control ventilation, so as not to destroy the plants, an automatic device is needed - a self-made thermal drive for the greenhouse.
You can purchase a factory-made device, but to save money, you can make it yourself from available materials.
How the thermal drive works

Some owners of protected structures simply open the doors and windows of the greenhouse for a while. This causes drafts that harm the plants, sometimes it leads to the death of capricious crops.
Constantly opening and closing windows for ventilation requires the constant presence of the owner of the greenhouse on the site. But working people cannot do this. In this case, a thermal drive helps out - a small automatic device that, if necessary, adjusts the position of the vents.
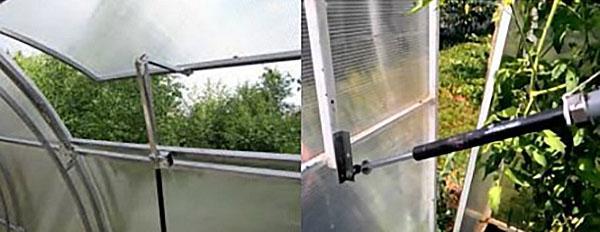
A liquid - cyclohexanol is poured inside the cylinder of the device. When the air heats up to a certain temperature, this liquid expands strongly, and when it gets colder it contracts. It fills the cylinder and acts on the piston, which presses on the rod, and it moves the door or window.
The simplest homemade devices
Craftsmen use the simplest parts and materials to make a homemade thermal actuator.
From a plastic bottle
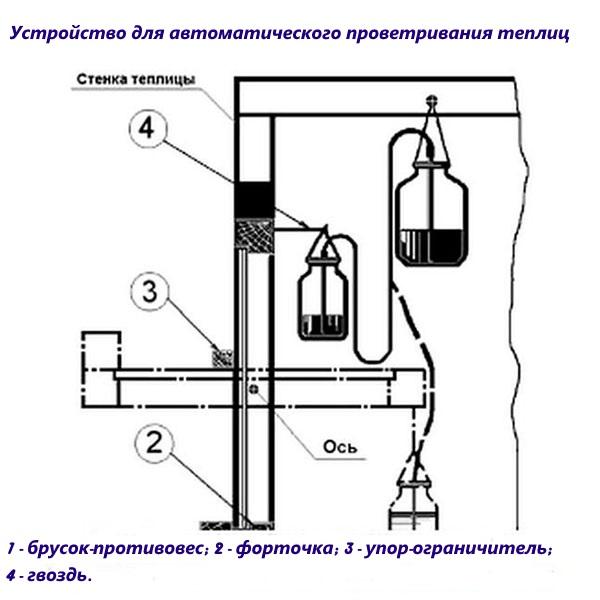
 The cheapest do-it-yourself greenhouse ventilation system is suitable for small protected structures with several frame windows, which rotate on an axis. To work, you need 2 plastic bottles (with a capacity of 1 and 5 liters), a small piece of plastic film, a 1 meter long PVC tube and 2 nozzles, a wooden board.
Step by step production:
- A hole is made in the bottom of a clean 5 liter bottle.
- Insert the pipe and attach it to the PVC pipe. All joints must be well sealed with thermal paste.
- The tube is inserted into a 1 L bottle and passed through a hole in the roof.
- After that, a large bottle is wrapped in black plastic and hung at the top of the greenhouse.
- A 1 liter bottle is placed near the window, the board is nailed to the window, and its other side is attached above the bottle without squeezing it.
When a large bottle is heated from it, warm air squeezes the liquid into a liter bottle. It straightens up and becomes heavier from the incoming water and as a result moves the board, and it turns the window, providing the necessary ventilation of the greenhouse.
From a rubber ball and cylinders

A simple machine for a greenhouse, it will not be difficult to make it yourself:
- You will need to prepare a wooden box, 2 cylinders, a board, a hose and a ball.
- The cylinders are connected together, a hose is connected to them.
- Its second end is fixed on the nipple of the deflated ball, it is placed in a box and closed.
- A board is attached to the lid and we connect it to the window frame.
- The cylinders are suspended at the top of the greenhouse, and the box in which the ball is located is placed below the window.
The cylinders will gradually heat up, and warm air from them will begin to flow to the ball. It will begin to expand, as a result it will act on the lid and open the window transom through the fixed board.
The simplest devices are easy to make with your own hands. But they will last less than factory devices. To make a more reliable thermal actuator, you need to use durable and expensive materials.
Do not forget that you can make a simple device, for example, from bottles, quickly and almost free of charge.
Reliable homemade thermal actuators
You need to find more time to work, but you will get a device that can last a long time without breakdowns.
From an office chair
 If you have a used office chair, it will serve as a source of materials for making your own reliable device for ventilating a protected structure. Each seat has a seat lift cylinder. It will serve as the basis for the thermal actuator.
In addition, you need to prepare engine oil and a piece of metal pipe. Find a welding machine grinder and a vice.
The device is made as follows:
- The edge of the plastic rod is fixed in a vice and then pulled out. The valve pin will become available to your eyes;
- A steel axle (5 cm long and 8 mm in diameter) is clamped in a vice. The cylinder is supported on it and the air in it is released;
- Cut off part of the cylinder with a grinder and remove the rod. It is necessary to work carefully so as not to damage the sealing lip and the surface of the part;
- A thread with a cross section of 8 mm is cut on the rod, all the parts are washed (there should be no steel shavings anywhere) and the cylinder is reassembled;
- The stem is carefully removed from the sleeve so as not to accidentally damage the oil seal;
- Screw the nut onto the stem, this will not allow it to fall into the cylinder. After that, an aluminum piston is inserted inside and a pipe is welded to it;
- At the end of the work, a nut is screwed onto the thread cut on the rod and the rod is attached to the window frame by means of a fork.
After installing the device, you only need to fill in oil. Expanding when heated, it will act on the stem and open the window. When the air cools down, the oil will also cool down, after which the window will close.
From a car shock absorber
 A simple shock absorber from a passenger car is also converted into a thermal drive, but they will need to be modified. First, gas is released from the shock absorber, after which the receiver is made. If you know how to work with metal, then it will be easy to make it yourself or contact a turner.
After the air has been displaced from the shock absorber, engine oil is poured into it. After that, you need to check the tightness of the device. Install it in place by attaching the rod to the window frame, and the lower part to the support.
It is better to mount the device at the top of the greenhouse, where the air warms up faster. Thanks to this, the engine oil will begin to expand immediately when the air warms up. At the right time, the system will open the window. When you install a do-it-yourself thermal actuator for greenhouses from a shock absorber, all that remains is to check its performance.
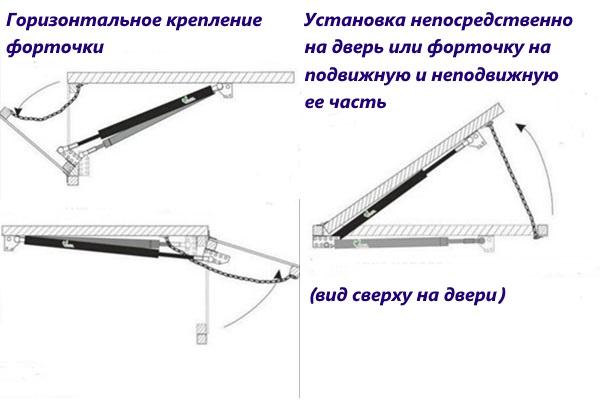
Be sure to check that parts of any device do not touch the frame or walls of the greenhouse during operation. If you decide to use a factory thermal actuator, then the work is simplified due to the fact that installation instructions are provided with it.