Gloxinia care and reproduction at home
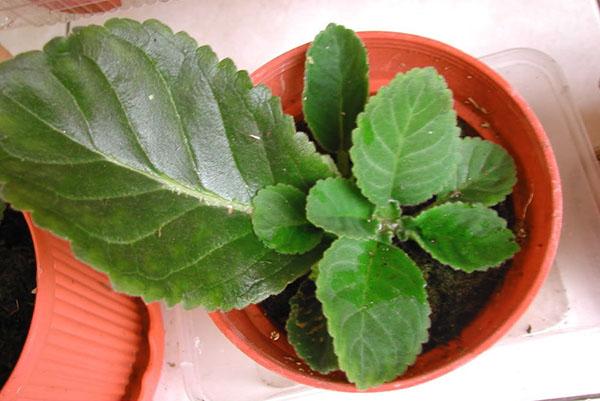
 Gloxinia with large bells and pubescent leaves is one of the most desirable indoor flowers for both beginners and experienced gardeners. Instructions for propagating gloxinia at home, photos of plant care at this crucial stage will tell you how to independently replenish the collection with a bright flower.
Gloxinia, like their closest related species, can vegetatively reproduce:
- using a sheet or part of it;
- stem cuttings cut from an adult plant;
- by rooting a peduncle, on which daughter plants are formed;
- dividing the tuber.
Not all methods are equal in simplicity and effectiveness, but when it comes to a rare variety or saving a favorite flower, you need to know how gloxinia reproduces and use all the possibilities.
On this topic:gloxinia home care!
Gloxinia leaf propagation

When rooting on the base of the leaf plate and even on large veins, gloxinia can form tiny daughter rosettes with their own nodules.
You can root a leaf for gloxinia propagation:
- in water until the roots are formed at the cutting, sufficient to obtain nutrition in the soil, after which the seedling is transferred to the substrate or peat tablet;
- by immediately planting a leaf cutting in a peat tablet or light mixture.
How to propagate gloxinia using a leaf cutting?
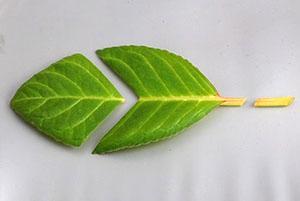
First of all, you need to stock up on a clean, and preferably a new blade or scalpel. A leaf is cut from an adult healthy plant so that a 2–2.5 cm long stalk remains at the base of the leaf plate.
 You should not take old, wilting or, conversely, only opening young leaves for reproduction. If the gloxinia is small, “baby” first leaves remain in the lower tiers - they are also not suitable for obtaining young rosettes.
If the gloxinia leaf is large, you can cut it into fragments with separate veins, so that when gloxinia propagates, as in the photo, and when caring for the plant, you get more daughter outlets.
The leaves are carefully dipped into transparent glasses, matched to the size, filled with boiled water at room temperature.
The cutting should not be deeply embedded in liquid This can provoke the development of rot. It is enough for the water to cover no more than a centimeter of the length of the cutting or leaf fragment.
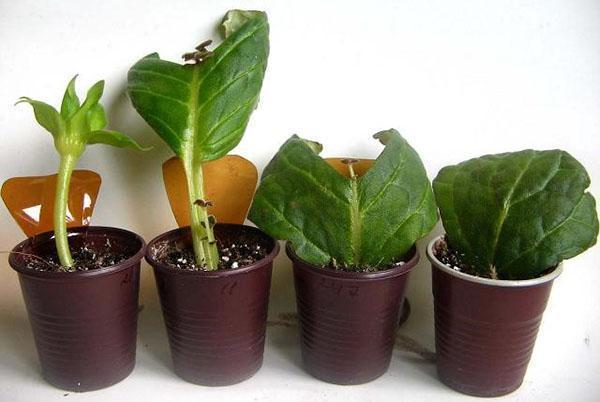
From above, a glass with material for the propagation of gloxinia is covered with a bag without squeezing or injuring the sheet. A miniature greenhouse is placed in a warm, well-lit place where there is no risk of direct sunlight. In this form, the leaf will have to stay from 2 to 3 weeks, until a callus or a full-fledged root system forms along the edge of the cutting. During these days, caring for gloxinia at home, as in the photo, during reproduction, an impromptu greenhouse is carefully ventilated several times.
 After the formation of centimeter roots, the leaf can be transplanted into the ground. Depending on the capabilities and preferences of the grower, this can be:
- ready mix for indoor plants based on peat;
- a mixture of sphagnum and ready-made soil;
- perlite or vermiculite;
- sand and peat substrate;
- crushed sphagnum.
 Before the leaf used for the propagation of gloxinia enters the soil, drainage holes are made at the bottom of the container and a 1–3 cm layer of crushed foam or other non-absorbent material is arranged. Pour a substrate on top, which is well moistened.
When planting, it is important not to crush or damage the sheet in any way, otherwise the tissues in this place will quickly rot, causing the death of the entire sheet plate.
The petiole is buried 5-10 mm so that the resulting roots and callus are covered with soil. The shallow embedment depth helps small outlets to reach the surface faster. And if necessary, the substrate around the cutting can be additionally poured.
 The sheet planted in the ground is again covered with a bag together with the container in which it is located. Caring for gloxinia during its reproduction at home, as in the photo, comes down to airing and gentle moisturizing when the substrate dries out.
In the future, the grower will have to be patient, since the first daughter outlets with a tiny nodule at the base may appear only in a month or later. Sometimes only tubers can be observed. This means that the children have plunged into "hibernation", and after a while the foliage will appear.
 Having studied the video on the reproduction of gloxinia with a leaf, you can learn all the subtleties of the process and visually get acquainted with all its stages. This will help you avoid mistakes in practice and successfully grow your own young rosettes of your favorite flower.
Reproduction of gloxinia peduncle
 If there is a plant in the gardener's collection that you would like to propagate, but there are not many leaves on the bush, you can use another method. In this case, they take peduncles, on which flowers have only recently withered, and gloxinia is propagated like a leaf.
To obtain small plants, it is enough to leave a 5–6 cm stalk. The excess is cut off with a blade, and the peduncle is immersed in water per centimeter. The rest of the technique is completely the same as growing gloxinia using a leaf.
The method is useful for reproduction of gloxinia of rare varieties and hybrids, because in this case there is little risk of spontaneous mutations that change the appearance of the plant and its flowers.
Planting a stem cuttings of gloxinia
 You can root and get a young plant from the top of the stem. Such planting material should have several leaves and a 3-centimeter stalk for immersion in the substrate.
It is better to cut a stalk from a compact healthy bush, which was previously in a well-lit place and received the proper amount of nutrition and moisture.
Since a rather large apical stalk is planted in the ground, a pot with a diameter of 9 cm is suitable for the propagation of gloxinia in this way.A powerful drainage is made at the bottom of the container at least 2 cm thick, and a light loose substrate is poured on top that allows air and water to pass through well.
Trying not to press or damage, the cutting is buried 2 cm in the ground, previously watered with settled water at room temperature. The substrate at the warp of the stem is easily compacted to give the shoot a stable upright position.
As with the propagation of gloxinia with a leaf, the pot with the cuttings is covered with a bag on top and left in diffused light, warm, until the plant takes root. As necessary, the seedling is ventilated, and the soil is carefully moistened with a spray bottle, trying not to get on the leaf plates. After a month, the plant grows roots, and it can be switched to normal growing mode.
How to divide the tuber correctly?
 It is more difficult and risky to use tubers for reproduction of gloxinia, since the occurrence of rot on them or their drying inevitably leads to irreparable consequences. The danger is aggravated by the fact that the cut tubers take much longer to acclimate and recover than the green parts of the plant.And only after that, the growth of new outlets begins on them.
How to propagate gloxinia by dividing a tuber? And what are the features of caring for a plant after such an operation?
For this method, only large tubers are suitable:
- with a diameter of at least 5 - 6 cm;
- with a firm, healthy surface without signs of rot, fungal infections or other damage;
- with awakened growth points, and even better with sprouts about 2 cm high.
Divide the tuber with a disinfected sharp blade into parts so that each fragment has its own sprout or potential growth point. Places of cuts are treated with activated carbon crushed to a powder state or, if this tool is not available, painted over with a layer of brilliant green. To make the tuber less injured in the soil, it is dried and additionally coated with garden varnish. This measure will help to avoid bacterial or fungal infection of the planting material used for the propagation of gloxinia tubers.
 Parts of the tuber, without deepening, are embedded in a moist substrate. In the future, caring for gloxinia during its reproduction consists in extremely careful watering. If the soil is watered too generously, the tuber in most cases dies.
For planting, it is more convenient to take transparent glasses in order to constantly monitor the development of the root system and the condition of the tubers. For moderate watering, you can use a pan with water and a wick, and to moisten the surface layer of the soil, take a syringe with a thick needle.
When white healthy roots cover the entire volume of the soil, and the rosette at the top of the tuber gets stronger, the plant is transferred to a permanent pot.